Overview
This phase starts once the Seller agrees to list with us, and ends once the MLS listing begins.
There will most likely be a period of time between winning the listing and the listing going Exclusive. There are many steps of the listing preparation you can do during this time, however certain items need to be in place in order to begin.
Once they are confirmed to be an upcoming listing, the admin or lead agent will create: Video Tutorial
Google Drive folder with the full property address and names of sellers
example for the format: 123 Main Street (Jane and John Doe)
A second Google Drive folder in the previous one titled “123 Main Street Internal Client Folder”.
Create a Google Sheet using the template “0051 - CHECKLIST-SELLER CLIENT” and fill in as much of the information you can (usually names, phone numbers, and email addresses)
“Move” the file to the Internal Google Drive folder from step #2
Create a Google Sheet using the template “0052 - Checklist-Internal Listing Process”
“Move” the file to the file you created in step 1
Either move from the “Leads” board or create a new one on Monday.com on the “Seller Board 2.0” under “New Qualified” or “Preparation and Exclusive Phase”
Use the same format as we do for labeling the folder - 123 Main Street (Jane and John Doe)
Add any information you have (like listing dates, staging appointment, pre-inspection, photos or video if they are booked)
Link the Google Form you created in step #3 under “Intake Form”
Link the Google Form you created in step #4 under “Concierge Form”
Check to see if they are already in FollowUp Boss
If not, add them as a new client
Regardless if they are or are not in FUB, add the information you do have in and assign the lead agent
Add to the “Deals” section within the person’s profile section (on the right side of the screen) and fill out at least the property name. Use the same labeling system as in step #1
Be sure to add them to iXact as we are in between iXact and FUB as CRMs right now
E-mail the clients to introduce yourself as well as ask them to fill out the first portion of the Intake Form and send over pictures of either their Driver’s Licence or Passport to complete the FINTRAC portion of the paperwork.
If they are selling a freehold, have them fill out to line #49 as well as lines #69 to #75.
If they are selling a condominium, have them fill out all the way to line #75 as this will include the condominium information portion.
Steps
1) If the listing agreement is not yet signed:
Lead notifies Sellers that we are preparing the listing paperwork. Asks if they have any questions.
Admin - calls clients to gather any missing information on the property or on the Sellers themselves that is missing from the Intake form:
FINTRAC info for Sellers (copy of ID and Job Title/Employer)
Their full contact info, including on email address for each Seller who will be signing.
Property Tax amount
Utilities amounts
Condo information (only if they are selling a condo)
Admin prepares the listing for signatures. Key things to remember:
Four forms are needed in total: (it is easiest to search with the document number at the end of each form name)
1) Working with a Realtor #810
2) Listing Agreement #200
3) Schedule A to the Listing Agreement (Data Sheet) #960
4) FINTRAC Individual Identification Records (one for each Seller named on the ownership) does not have a form number, so search FINTRAC*
5) Seller’s Direction Re: Property/Offers #244
Commission - 5% total, or “4.5% if Listing agent represents buyer, not in multiple offers.”
Listing Period = 6 months - 1 day
Schedule A - Include:
Legal Description
PIN #
Roll # (ARN# 15 digits)
All these can be found on Geowarehouse
FINTRAC for Sellers - Must include as much detail as possible, including Job Title and Employer’s Name. If a Seller is retired, say what company they retired from and what their job was.
Working with a Realtor - Don’t forget this.
(Video tutorial on how to fill out the paperwork from above)
Admin uploads the listing agreement forms to NexOne for electronic signatures.
Lead notifies Sellers once forms are all successfully uploaded.
Admin changes listing from “kit” to “exclusive” or “active” once the property is listed.
2) Once the listing agreement is signed:
Lead or Admin arranges pick-up or drop-off of extra keys for lockbox and hangs iBox
Check with owner (or condo if it is a condo) as to where the iBox can be hung
Lead or Admin introduces stagers via email and Sellers coordinate when they will meet with stagers.
Admin arranges for Photos and iGuide tour with photographer.
We typically shoot photo with iGuide floor plan
Video is shot at a separate time as it is with another company
To book, go to https://www.primevisuals.ca/ and select “Schedule Photos or an iGuide”
Let Sellers know when to expect photographer and what the procedures will be:
Sellers can choose to be home or not
This is the cleanest the house should be, since this attracts buyers to see the home in person
Lights should all be on
Blinds and curtains should be open
Cars should be out of driveway
We don’t photograph unfinished storage areas or garages, these can be messy and the Seller doesn’t need to worry about them.
Garbage and recycling bins should be away
The photographer will not move or adjust anything, so how you leave your home is how it will look in photos
(Video tutorial on where and how to book photos with PrimeVuisuals)
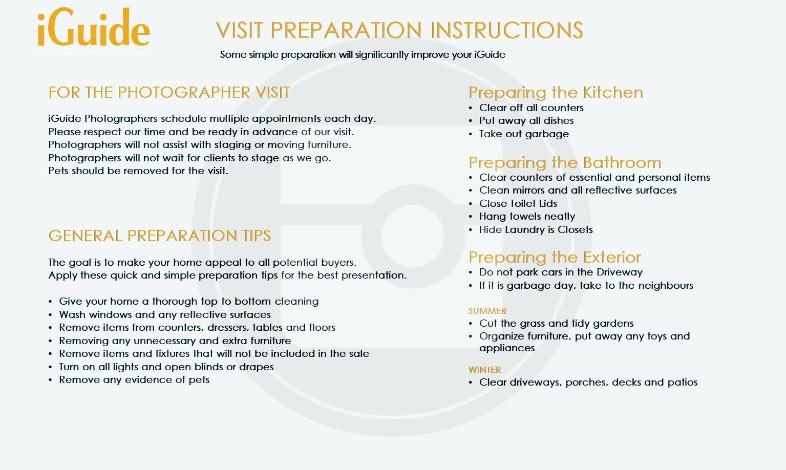
Below is a copy of the visit preparation instructions from Prime Visuals
Once the photos are returned and the iGuide produced;
You will receive an email from iGuide Portal and it will most likely be “in production”, meaning you will have access to some of the assets, but not all of them yet. You will receive a second email with the full iGuide.
Forward Nick the completed iGuide email
Select the “Branded” link under “Virtual Tour Link” and add this to the Monday.com channel as you will be using this link alot
Download all of the files under “Downloads” into the Google Drive folder
Create a file
Admin arranges videography with Michelle from Elephant Shoe media. A video shoot will vary in time, however, it will take about half-hour to 45 minutes in the house and the rest in the neighbourhood and small business, so owners just need to be out of the house for the first potion.
Check with Nick to see what types and how many videos you would like to shoot. Typically, we shoot a property video walkthrough, a neighbourhood video, and 2 videos (one short, one interview or highlight) with a locally owned business in that area that we will partner with for a giveaway
Co-ordinate with the owners of the property to find a few time options for the video and make sure they work with Nick and Karim’s schedules (we typically shoot both photo and video in one day)
E-mail Michelle to see what her availability is and propose the date options you have collected from the owners and Nick and Karim.
Once booked, explain that they should expect a similar experience as with the photographer and should follow the same steps in preparation
Once the video is returned, Admin is responsible for:
Downloading the videos to a Google Drive folder under the property folder
Uploading them to YouTube
Subtitling them in HappyScribe
Downloading a subtitled copy of the video as well as the .srt file with the subtitles
Upload the subtitles to YouTube and add text and appropriate tags
Add the video to the video tour page in the Feature Sheet
Admin orders a sign to go up in front of the house (may not apply to condos) for the listing start date.
Admin pre-loads data into Matrix if it is an MLS listing.
Admin creates a Feature Sheet for the listing and adds the link to the Monday.com channel as well as the Slack channel.
Admin creates a first draft and sends it to the owners and Nick for review and any corrections along with the link to the iGuide
Admin writes first draft of blog post for the listing.
Property photo as header
Admin creates ads for the life cycle of the listing and puts them in the listing folder in drive.
Admin checks with Nick to make sure that he is happy with all copy and creative (Matrix, feature sheet, ads)
Admin checks with Seller to make sure feature sheet is accurate and Seller is happy with it.
Admin invites Seller to follow us on Social media so that they can share ads for the listing
FB page, Instagram, Twitter, LinkedIn
Admin verifies with Seller what will be the best day(s) for the first open house.
Admin prints colour feature sheets for in-house, and black-and white for sign holder.
3) If it starts as an exclusive listing (non-MLS):
Go to the instructions on exclusive listings.
3b) If it starts as a “regular” (MLS) listing:
Go to the instructions on MLS listings.