Pose matching is a simple animation technique which automatically picks the animation starting time based on the current pose of the character. This ensures that the gap between the current pose and the first pose of the new animation is minimal and the amount of blending required is significantly reduces.
With pose matching, foot cycles being out of sync is no longer a problem and sync markers become un-necessary.
How It Works
When transitioning into an animation state, typically an animation starts from the beginning or a pre-defined offset (excluding sync marker use). With pose matching node it works differently. Instead of starting at the beginning, it searches through a short list of poses (generated during blueprint compilation), compares them with the current pose and then starts the animation at the time of the closest pose.
To compare the pose data with the current pose, it is necessary to use the Motion Snapshot node, further down in the animation graph. Please see the section of this manual detailing the Motion Snapshot node for more details.
The data used for pose matching is determined by a ‘Motion Configuration’ asset just like motion matching except all response type Match Features are ignored. The default calibration also comes from the motion config but can be modified further or overriden with a ‘Motion Calibration’ asset.
Initial Setup
In a Motion Symphony workflow, pose matching nodes effectively replace regular sequence players. However, there are a few more settings to configure to ensure that the pose matching works properly.
Step 1: To create a pose matching node, right click in your graph and choose ‘Pose Matching’ in the ‘Motion Symphony’ category.

Step 2: Select the new Pose Matching node and set its sequence in the ‘Settings’ category on the details panel.
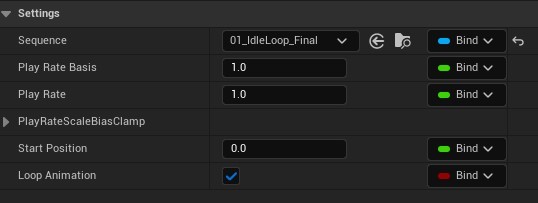
Note: Other settings in this category are identical in nature to the regular sequence player.
Step 3: In the ‘Pose Calibration’ category, slot in your ‘Motion Configuration’ which defines the pose features that you would like to be considered for pose matching. Note that ‘Input Response’ type match features will be ignored. You can also slot in a ‘Motion Calibration’ asset to modify or override the default calibration, but this is optional.
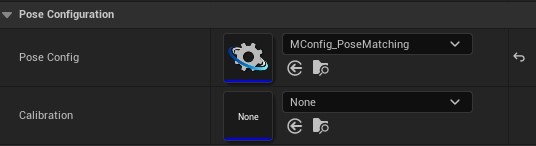
Pose Config - The ‘Motion Configuration’ asset which defines the aspects of the pose you would like to match.
Calibration (Optional) - An additional calibration to modify or override the defaults within the ‘Motion Config’.
Step 4: Make sure the motion snapshot node is setup near the end of your animation graph. The ‘Motion Config’ used for the pose matching node will be automatically registered to the motion snapshot node at runtime. See Motion Snapshot
This should be sufficient for a minimal setup.
Other Settings
Some additional settings under the ‘Pose Matching’ category can be used to have an increased control of the pose matching node and make it more efficient.

Pose Interval (Default 0.1s) - The time interval between poses generated during graph compilation. The lower this value the more poses there are for potential matching.
Poses End Time - The time in the animation after which no more poses will be generated for matching. In some cases it may not be desirable to start the animation beyond a certain time point. If so, set this value to that time so only poses before this time can be generated and used.
Note: If you only desire a single pose to match at the beginning of the animation, set the PoseInterval to be greater than the Poses End Time.
Runtime Mirroring
The pose matching node supports runtime mirroring. If it is enabled, then additional poses will be generated for the mirrored version of the animation as well. When the node is activated (e.g. state transition) it will choose either the mirrored version or the normal version depending on how well the poses match. This could be very useful for something like a ‘staggered’ idle animation which could be either left or right foot forward.
Motion Symphony 2.0 uses UE5’s ‘Mirror Data Table’ for runtime animation mirroring.
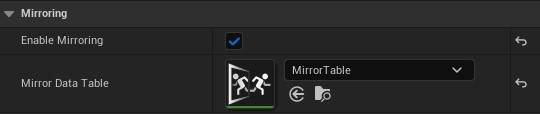
Enable Mirroring - Check this box if you want to enable runtime mirroring
Mirror Data Table - The asset to use to inform mirroring.