Tagging is not essential for your first attempt at motion matching but it is vital to get a polished, production ready result (especially if you are using Mocap). Basically tags allow the user to mark up sections of animations that should be treated differently during pre-processing.
Note: If this is your first time creating a motion matching character. Skip to the next page on Pre-Processing and come back to tagging later.
There are several kinds of tags that ship with Motion Symphony:
DotNotUse
GameplayTag Traits
Cost Multipliers
Next Natural Markers
Distance Matching Markers
It is also possible to create your own custom tag types with blueprint but that is an advanced topic which will be covered later in this manual.
Note: Tags may look like animation notifies but they are not. They only run logic during the pre-process phase in the editor and do not tick at runtime. For runtime animation logic, please use animation notifies on the source animations. The motion matching node will trigger any notifies that you have added to those animations.
How to Add Tag Tracks
Before adding tags, you first need to add at least one tag track to place them on. Add a tack track by clicking the ‘Track’ dropdown on the timeline and choose ‘Add Tag Track’ and name the track whatever you like.

Once the tag track has been created you are ready to add tags to it. You can add multiple tag tracks if you desire but this has no impact on the data, it is only for organizing your tags in a clean way.
Note: You can add multiple tracks to help organize your timeline and so it doesn’t get too crowded. However, be aware that this is only cosmetic and does not effect the data.
How to Add Tags
Once you have a tag track, simply right click on the track in the timeline area. You will be prompted with two options:
Add Tag - Add a tag that sits at a single time point in the track
Add Tag Section - Add a tag that covers a range in the track
Select your desired tag type and then choose a tag to create. After clicking on the desired tag it will show up in on the track.

Once the tag has been created you can select it by clicking on it, move it by clicking and dragging it and resize it (for Tag Sections Only) by clicking on the tags handles and dragging them.
Editing Tags
Some tags have data that can be edited. To edit this data simply select the tag by clicking on it. Its details panel will show up in the contextual details panel to the bottom left of the editor. Please see the relevant tag types for more information on tag details.
Note: The tag details panel is shared with the animation details panel. To edit animation details again simply select the relevant animation in your animation list.
Tag Types
DoNotUse
Any pose or section of animation marked up as ‘DoNotUse’ will be filtered out of the pose search at runtime. These poses can never be chosen by the motion matching algorithm. Use this tag to “curate” your animation set, remove ugly transitions you don’t like and reduce excessive redundancy.
Note: Redundant animation in motion matching is good to a certain degree but if there is too much redundancy then that animation database becomes messy and un-necessarily bloated. Results can become muddy.
A few good use cases of the DoNotUse tag include:
Marking out sections of animation you don’t like
Marking out the redundant looping animations (i.e. the loops between transitions)
Marking out excessive and redundant stop animation (e.g. in a RunStartStop take)
Marking out prolonged idle animations
Gameplay Tag Traits
Gameplay Tag Traits allow users to assign a set of GameplayTags to an animation or to a section of the animation. This could be anything from movement speeds (i.e., walk, run, sprint) to stances (i.e. normal, combat) to physical states (i.e. Fresh, Tired, Injured). At runtime, the user can specify the current ‘Gameplay Tags’ that are ‘required’ and the motion matching node will only play animations that have those specified tags.
This effectively allows the motion matching node to have some form of ‘state’ within itself without ever actually changing states in the animation graph.
To edit the ‘Gameplay Tags’ on a specific tag, select the tag and choose the relevant tags that you would like to assign to it. It is possible to select multiple tags as this is a GameplayTag Container. If you don’t have any gameplay tags created, you can create them from the drop down menu or the project settings. Please see the UE5 documentation on ‘Gameplay Tags’ for more information.
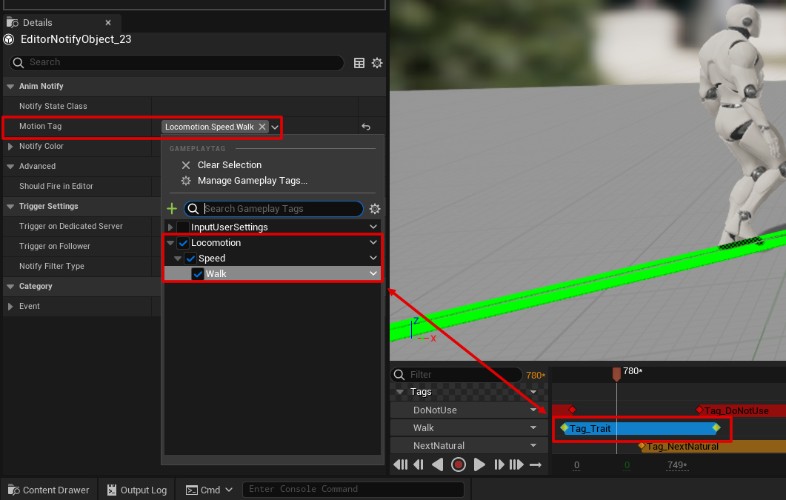
Motion Tags - List of gameplay tags chosen to apply to this section of animation.
Cost Multiplier Tags
Cost multiplier tags allow the user to specify sections of the animation that should have a cost multiplier applied at runtime to make the poses within either less likely (>1.0) or more likely (<1.0) to be chosen by the motion matching search algorithm. Common Use cases include:
Loops (e.g. RunFwdLoop) - A cost multiplier between 0.8 - 0.9 ensures that loops are played more smoothly and chosen more often over redundant cycles elsewhere in your animation data.
Rare animations - A cost multiplier > 1.0 can ensure that some animations only happen rarely. Use this when a specific animation is triggering too often in certain situations but you still want it to trigger sometimes.
Favorite Animations - if you have animations you would like to favour and play more often, consider giving them a cost multiplier < 1.0 to ensure they play more often.
To set the cost multiplier value, select the Cost Multiplier tag and edit the cost multiplier value in the contextual details panel:

Cost Multiplier - The cost multiplier to apply to all the poses within the tag range.
Override - If this is checked, the cost multiplier will override any cost multiplier applied to the animation as a whole. If override is not checked then the cost multiplier will be ‘multiplicative’ with the ‘whole of animation’ cost multiplier. In general leave this unchecked unless you have a specific use case.
Next Natural Tags
‘Next Natural’ tags are a polishing feature for motion matching. Any pose marked as a ‘Next Natural’ will not be included in the normal ‘search database’. However, they will still be searched if they are within the next few seconds of animation from the current animation. Essentially this allows you to specify animations sections that should only play if a previous section of the same animation is already playing. This prevents animations swapping too frequently and stops some animations occurring out of context.
To make the most use of this tag, it is recommended to use it for the latter half of complex movements such as starts, stops and plants. Be careful not to be too aggressive with it as overuse can reduce animation flexibility.
The ‘Next Natural’ tag has no specific settings that need to be adjusted.
Distance Matching Markers
In order to pre-process the required data for ‘Distance’ match features, it is necessary to use ‘Distance Marker’ tags on the timeline and configure them appropriately for any given movement.
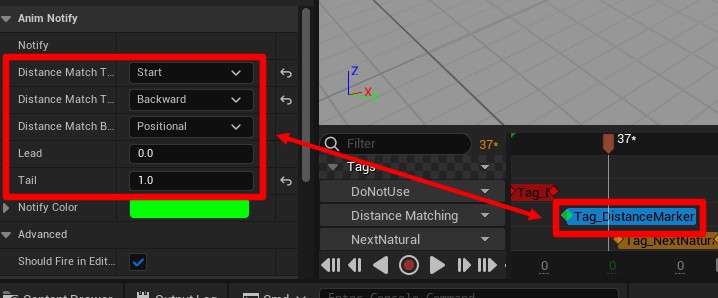
Distance Match Trigger - An identifier for the animation that triggers distance matching:
Start - An animation where the character is idle and then starts moving
Stop - An animation where the character is in motion and then stops moving
Plant - A sudden change in direction where the foot is planted
Jump - A jump
Turn In Place - An animation where the character is idle and then turns to face a different direction.
Distance Match Type - The type of distance matching that this tag is for
None - Distance matching is disabled
Backward - Distance matching backward to a point (i.e. moving away from it). Used for ‘start’ type animations
Forward - Distance matching toward a point (i.e. moving towards it). Use for ‘stop’ type animations
Both - Distance matching both toward a point and then back to it. Used for ‘plant’ type animations
Distance Match Basis - Is the distance matching positional or roational
Positional - Distance is measured by a distance between two locations
Rotational - Distance is measured by an angle
Lead - Amount of time in the future from the tag point that this tag should calculate distance matching metrics for (usually around 1s)
Tail - Amount of time in the past that from the tag point that this tag should calculate distance matching metrics for (usually around 1s).
For more information on distance matching, how it works and how to use it please see the section on the ‘Distance’ match feature and the ‘Distance Matching Component’.
Custom Tag Blueprints
It is possible to create your own custom tag blueprints and run your own logic during pre-processing. However, this is a very advanced topic and knowledge of the inner workings of Motion Symphony is required.
Please see the advanced topic on ‘Custom Pre-Process Tags’ for more details.