This section of the 2.0 update manual goes through step by step what you need to do to convert your project from MS1.0 to MS2.0 after installing the new plugin. Fortunately, the majority of the work in setting up ‘Motion Anim Data’ modules does not need to be re-done; the majority of the work is involved with the Motion Config assets.
Motion Config Update
The first thing you need to do is update your motion config by selecting several match features to replace the previous ‘fixed data’ motion configs.
Step 1: Either open your existing Motion Config or create a new one. You should be presented with two empty lists, ‘Input Response Features’ and ‘Pose Quality Features’ as shown below:

Step 2: Add new match features to these lists to define your motion configuration and exactly what you want to match.
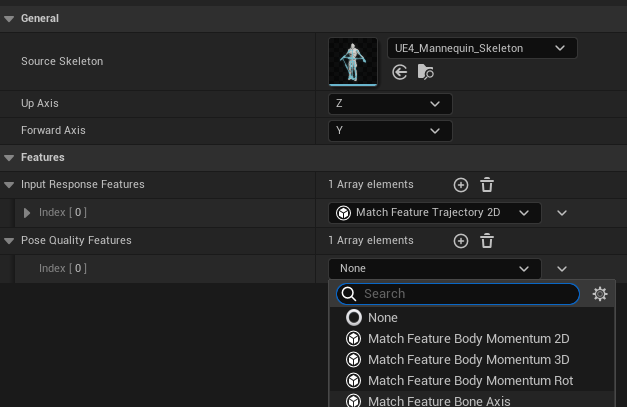
Input Response Features - The ‘Input Response Features’ list is for features like Trajectories and distance matching that require the user to inject the data into the motion matching node at runtime. These features allow for user input to control the motion matching and affect the responsiveness of the system.
Pose Quality Features - The ‘Pose Quality Features’ list is for features like body momenum, bone location and bone velocity. These features are automatically measured at runtime and do not require any user input. They control the quality of the animation matching.
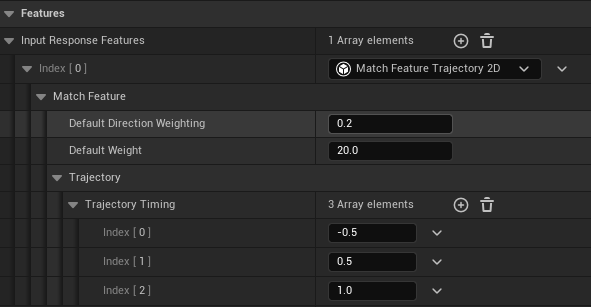
Once you have selected your features make sure you modify the settings of them including their default weightings. For the most part the settings for each Match Feature are self-explanatory if you are familiar with MS1.X.
Step 3: Set Default Calibration Weightings
The default weightings for each feature are very important in MS2.0 as they define the default calibration as the name implies. The calibration modules will instead be used to override or apply additional modifiers, to calibration. With this in mind the first port of call for calibration now occurs within the Motion Config itself. Note that some features can have multiple weighting options like the trajectory 2D feature below where the trajectory position and facing can have different weight settings.
Note: you may notice some different in calibration between MS1.X and MS2.0. This difference is inevitable as some changes had to be made for the system to work with only scalar floating point units. It requires some adjustment if you are already familiar with MS1.X, however, the same results or better can be achieved.
Calibration Data
Just like MS1.X a Calibration Data asset is still required in MS2.0 though its purpose has changed slightly. Instead of defining the default calibration, it is designed to only adjust the calibration for different use cases. Say for example you want to use the same Motion Config for two different animation data sets but need a different calibration (e.g. running vs strafing sets), you would have two different calibration data assets but still only use one Motion Config.
Note: Having as few Motion Config’s as possible in a single animation BP is highly recommended as it reduces the amount of work the Motion Snapshot node needs to perform.
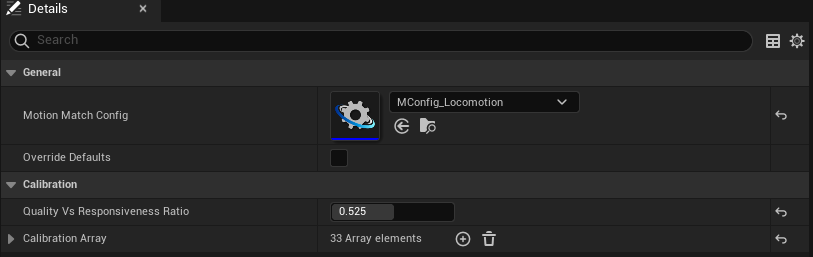
As of MS2.0 Early access release, the only adjustment that can be made in the Calibration Data module is the Input Respose Vs. Pose Quality slider as was available in MS1.X. The calibration weighting array is populated automatically upon processing of AnimData and should not be modified. Upon full release following UE5.3, this calibration array will be hidden (to prevent accidental modification) and a new interface will be available to tweak individual calibration overrides in a way that is easier to read than a large array of floats.
Anim BP Event Graph
Since the system is now generic and can take more than one input, we can no longer use a ‘Trajectory’ data structure as the input for the motion matching node. Instead we use a ‘MotionMatchingInputData’ struct as the input to the motion matching node which can handle all ‘Input Response’ type Match Feature data. Essentially this struct is a wrapper for a floating point array which gets filled with data based on our inputs.
Step 1: Delete your existing ‘Trajectory’ data structure variable as it is no longer required.
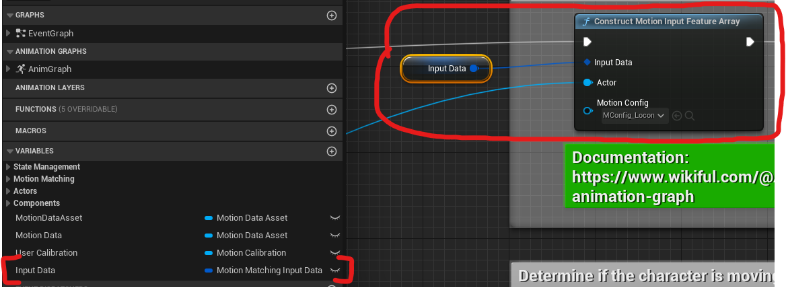
Step 2: Create a new variable of type ‘MotionMatchingInputData’ (you may need more if you have MM nodes that use different Motion Configs)
Step 3: On all appropriate Motion Matching nodes, set the ‘InputData’ to this variable.
Step 4: On the Update Event, fill the ‘InputData’ variable via the helper function ‘Construct Motion Feature Input Array’ as shown below. This function supports all built in Response Type match features and will automatically fill the InputData provided you have the appropriate components.
Note: Input Data constructed with a given Motion Config must only be used on Motion Matching nodes that use the same Motion Config.
Note: For this function to work you do need to have the appropriate components attached to your character. In the case of trajectory match features you will need a trajectory generator component that uses the same Motion Config. For distance match features you will need a Distance Matching component attached.
Mirroring Profiles
Mirroring profiles have been deprecated in MS2.0 in favor of using UE 5.X built in MirrorDataTable. Please replace all Mirroring Profiles with MirrorDataTables. Documentation for setting up MirrorDataTables can be found on Epic’s website.
Once the Mirror Data Tables have been created simply slot them in wherever you had mirroring profiles.
Traits to GameplayTags
Traits were a tagging system in Motion Symphony that would allow the user to tag sections of animations with certain traits. These traits could be anything like movement speed, stance or even type of movement like crouch or strafe. At any point at runtime the user could specify which traits were acceptable and the motion matching node would only play animations marked with those traits.
With Motion Symphony 2.0 this system still exists but instead of using the trait data type made for Motion Symphony, it has been updated to use Unreal Engine 5.X’s GameplayTags (FGameplayTag) instead. There are three main reasons for this change:
Providing consistency with the rest of Unreal Engine
Enabling future improvements to motion matching search queires
FGameplayTags are not limited to 64 total like traits and are easier to use and manage.
Due to the difference in data type, the update cannot automatically convert the old Traits to GameplayTags and this must be done manually. If you have not used Traits in your project then, no changes are required. However, if you have then there are two places where updates must be made in your MotionAnimData.
Step 1: Create gameplay tags to replace the ‘traits’ that you previously had. FGameplayTags are an Unreal Engine feature so please see the Unreal documentation on Gameplay Tags and how to create them.
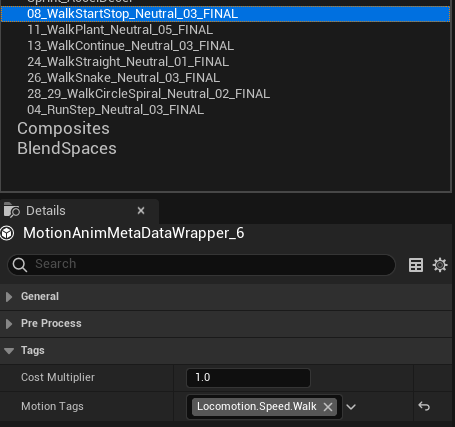
Step 2: Open your MotionAnimData asset and for each animation that had a trait set previously, set a gameplay tag instead.
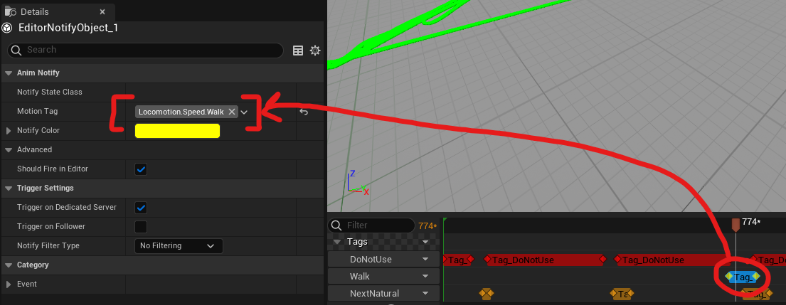
Step 3: If you tagged any animation sections with ‘Trait’ tags on the timeline, find those tags and set the GameplayTag to use for them.
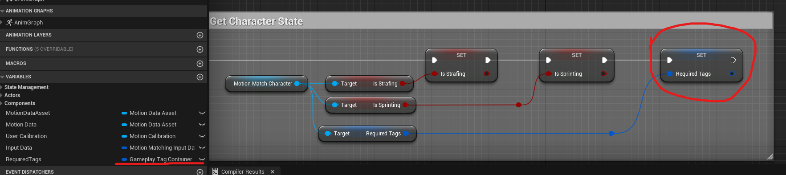
Step 4: Anywhere in your blueprints where you previously were setting ‘RequiredTraits’ as an input for your MotionMatching nodes, replace this with a GameplayTagContainer instead and modify your blueprints to accommodate this. Don’t forget to update your motion matching node inputs with the new tags.
Note: If you have tags sections on animations already for traits, you do not need to re-create those tags, you simply need to edit them and set the GameplayTag on them.
Motion Calibration Changes
The role of ‘Motion Calibration’ assets has changed. They are no longer compulsory for pre-processing or in ‘Motion Matching’ nodes. Instead, they have an optional role is to enable runtime tweaking of calibrations in certain situations. They can be used to either ‘Override’ or act as an additional set of ‘Multipliers’ and essentially allows different calibrations to be used on the same node and/or motion data which was previously not possible.
Note: You are no longer required to re-process Motion Data every time you change calibration weights on your motion config.
To accommodate these changes do the following:
Step 1: In the Motion Config, set the ‘Quality Vs. Response’ slider to be the same as that of your Motion Calibration.
Step 2: Right click on your ‘Motion Calibration’ asset and choose ‘Clear’
Step 3: Right click on your ‘Motion Calibration’ asset and choose ‘Initialize’
Your calibration data is now ready to be tweaked as necessary. If you do not wish to tweak it and only want to use the default calibration, simply remove the calibration asset from your motion matching nodes.
Note: While both ‘Override’ and ‘Multipy’ options are combined with normalization factors, it is recommended in most cases to use the ‘Multipy’ option to tweak calibrations from the default rather than override them completely. This requires significantly less work and allows your default calibration to act as a good starting point.
Re-Processing
Once all is complete, don’t forget to re-process. Nothing will work if this is not done.