Qa Space configuration includes:
General Configuration
Health Check
Recalculate Report
Create scope of requirements
Besides, here you can enable test IO extension and configure its synchronization with QaSpace. Refer to Test IO integration to learn more.
General configuration:
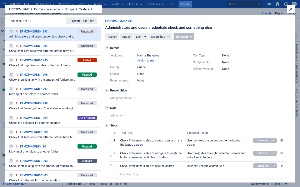
1) In the Bug Configuration section, define issue types that will be treated as Bug. Drag the ones you want from the Available issue types column to the Selected issue types column. In order to give you flexibility in adjusting our plugin to your workflow, you can consider any Jira issue as 'bug' in the configuration.
NB! If no issue has been selected, you won’t be able to create bug (sub-bugs) under test cases in QaSpace.
Steps:
Log in as a user with the Administer projects project permission.
Go to Jira Administration -> Projects. Scroll down to the bottom of the page.
Find "TEST MANAGEMENT" section in the left side menu bar.
Go to the QaSpace Configuration section.
Open the General Configuration tab.
Find the Bug configuration section.
Drag issue types from the Available column to the Selected column.
Save changes on the bottom of the page.
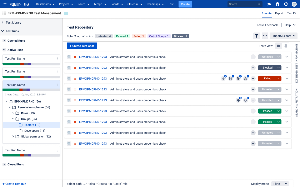
2) In the Test Status Configuration section, you will be able to customize test cases statuses according to your project needs.
When plugin is enabled it introduces a new JIRA issue type "Test" (representation of a Test case). Test cases life cycle is managed using test statuses. There is a set of default statuses, however, your project may use a set of custom statuses for marking specific Test cases progress stages. In order to give you a flexibility in adjusting our plugin to your workflow, you can manage custom test statuses in the configuration.
Default statuses are:
Untested, Passed, Failed - core statuses (not configurable);
Blocked, Out of Scope - configurable statuses.
It is possible to add a new custom status, pick a color for any status which is configurable, or remove a custom status. When the user removes a status, system allows changing existing Test cases with such status to another status picked by the user.
Steps:
Log in as a user with the Administer projects project permission.
Go to Jira Administration -> Projects. Scroll down to the bottom of the page.
Find "TEST MANAGEMENT" section in the left side menu bar.
Go to the QaSpace Configuration section.
Open the General Configuration tab.
Find the Test status configuration section.
Configure needed statuses set.
Save changes on the bottom of the page.
3) In the Configure Notifications section, define if you would like to receive notifications about ready to be re-executed tests. If yes, it will automatically set “BugChange>>Re-execute” label to tests based on changing status of linked bugs and sub-bugs on every night basis.
Steps:
Log in as a user with the Administer projects project permission.
Go to Jira Administration -> Projects. Scroll down to the bottom of the page.
Find "TEST MANAGEMENT" section in the left side menu bar.
Go to the QaSpace Configuration section.
Open the General Configuration tab.
Find the Configure Notifications section.
Select “Tests ready to be re-executed” option in checkbox.
Save changes on the bottom of the page.
4) Don’t forget to save the changes.
Health Check
Some administrator actions done while plugin was disabled could introduce issues with test ordering. In such case you will get a service message with instructions to handle it by Health Check. This action will fix all inconsistencies in entities related to QaSpace Test Management (Tests, TestRuns, Folders, etc).
Steps:
Log in as a user with the Administer projects project permission.
Go to Jira Administration -> Projects. Click on a project where you are going to perform Health Check.
Scroll down to the bottom of the page.
Find "TEST MANAGEMENT" section in the left side menu bar.
Open the QaSpace Configuration section.
Go to the Health Check tab.
Click the Health Check button.
Recalculate Report
This action will perform re-calculating charts on Report view for both Test Library and Test-runs.
Steps:
Log in as a user with the Administer projects project permission.
Go to Jira Administration -> Projects. Click on a project where you are going to perform Health Check.
Scroll down to the bottom of the page.
Find "TEST MANAGEMENT" section in the left side menu bar.
Open the QaSpace Configuration section.
Go to the Recalculate Report tab.
Click the Recalculate Report button.
Create scope of requirements
This action will create scope of requirements for every Test Run based on requirements of its Test Cases.
Steps:
Log in as a user with the Administer projects project permission.
Go to Jira Administration -> Projects. Click on a project where you are going to perform Health Check.
Scroll down to the bottom of the page.
Find "TEST MANAGEMENT" section in the left side menu bar.
Open the QaSpace Configuration section.
Go to the Create scope of requirements tab.
Click the Create scope button.